Part 1. Design
It is rare, nowadays, for teachers to have their own classrooms. And yet, somehow, I pulled it off, seemingly. I won’t celebrate to early on, but I have four walls I am allowed to decorate. On the back wall, I figured, I’d hang a Viking-ship-like shield wall, as can be seen below. 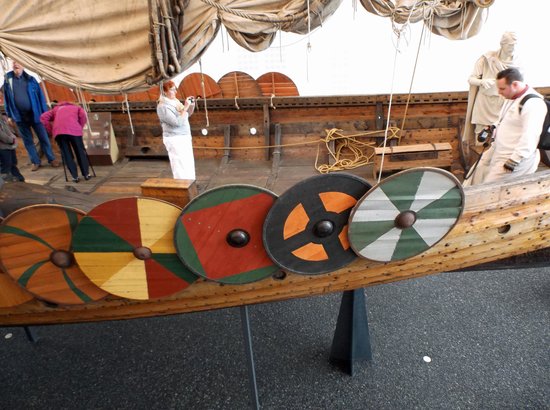
The shields all have a boss, a rim and are painted with colourful designs. Yup, this is akin to what I wanted. Luckily, I still had some material in the shed from when we built the planter out of wood that was about to be dumped. Below is a full list of tools and materials I have used.
Tools used
- Jigsaw
- Japanese pull saw
- Chisel
- Battery powered drill
- Screw bits
- Drill bits
- counterbore
- Random orbit sander
- Pens and pencils
- Measuring tape
- Paintbrushes
Materials used
- About six planks of recycled wood
- One long strip of 3cm by 1cm for side vertical slats
- One long pole of 4cm by 3cm for the central vertical beam
- Three dog-chew-bones made out of boiled leather
- Thin sisal wire
- Screws of various sizes.
- Acrylic paints (blue and white)
The build
After one of the most stressful weeks of my life, I came home with a strong sense of having to build something. I took my Japanese pull saw and chopped some planks to the right length. I figured out the length needed by making a make-shift compass out of a piece of wire and a nail.
After cutting the planks I made cut lines using the compass and cut them into parts of the circle using my jigsaw. I also cut the hole in the middle that would be covered with the boss and put the shield together with glue and screws.
The middle beam, which doubles as a handle was easy enough to make with te the jigsaw as well. I used a sharp chisel to round over the edges of the handle.


I applied a not-too-thick coat of blue acrylic paint. I should have painted before putting the boss on, but such is life. While the paint was drying I soaked the chew-bones in water to soften them up.


The leather was then easy enough to work with. I clamped it onto the sides of the shield and drilled holes through both leather and wood. Afterwards, I “sowed” the leather onto the side of the shield. Seeing that the chew toys I bought were quite small and cheap, they were made up out of multiple pieces. I enjoy the rugged end result, though. I also added some leather around the handle and used some sisal to keep it attached.


I then looked up some designs, picked the ones I appreciated and used white acrylic paint to decorate the shield. After all, I’m pleased with how it turned out and what the rim ended up looking it.


