Bird Feeder
Design
Rustic, sturdy, comfortable to use and environmentally friendly. That’s what I wanted this bird feeder to be. I think I nearly got there.
For sturdiness, I stuck with reasonably thick materials where I could. See the build process for more details on this. For environmental friendliness, I used mainly recycled wood. Everything, except for the planks making up the roof panels, was found or re-used. As I wanted it to be comfortable in use, I shun away from building in a door but instead added a hinge in the nook of the roof. This enables the user to easily add food and water for the birds after opening the roof.
Tools Used:
- General-purpose wood saw
- Jig-saw table.
- A fine wood cutting blade
- Fence
- Battery-powered drill
- Various drill bits (wood drill bits in various sizes, Philips head bits)
- Pre-drill bit
- Measuring tape
- Roofing square
- Portable workbench
- Clamps
- Quick-release clams
- Corner clamps
- Random orbital sander
- Sanding disks of 80, 120 and 240 grit
- Steel brush to take dirt off the branch with
Materials used
- One branch, about eight centimetres thick and two and a half meters long.
- Found in a park.
- Two planks of treated wood, 1,2 centimetres thick by 14 centimetres wide and 240 centimetres long
- Reused wood, given to me by a neighbour.
- Self-drilling screws
- These are excellent, but expensive when bought in the hardware store. Try finding the ones you want online.
- One piano hinge, with screws
Build
Stand
Due to the intelligent lockdown we’ve got going in the Netherlands, I have been spending a lot more time walking. This is great, although I do miss all my regular leisure activities, especially the dancing. A few weeks ago I spotted this branch, about 2,5 metres long, lying in the park. Employees of the munincipality come round every year and leave the branches they cut down. It’s good stuff.


I cut off the end, which had become quite nasty, then sawed off a piece of 80 centimetres. I want these bird feeders at a total hight of 130. To make the stand into an actual stand and not just a stick I drew the largest equal cornered triangle. Each corner has an angle of 60 degrees, which should have you end up with equal length sides as well. I took that triangle, drew a parralel line, a centimeter further out. This is where I cut in so that you end up with the situation on the right, below.


The reason for cutting the pole like that, is to firmly attach the legs. I made these by cutting three more chunks, each 45 centimetres long. After cutting them, I cut again, this time adding a 45 degree angle to one end.


As I didn’t want to use very long screws, and blowout would be terrible at this state, I used self-drilling screws that I had sunk into the legs using my largest regular woudcutting drill bit (12mm).
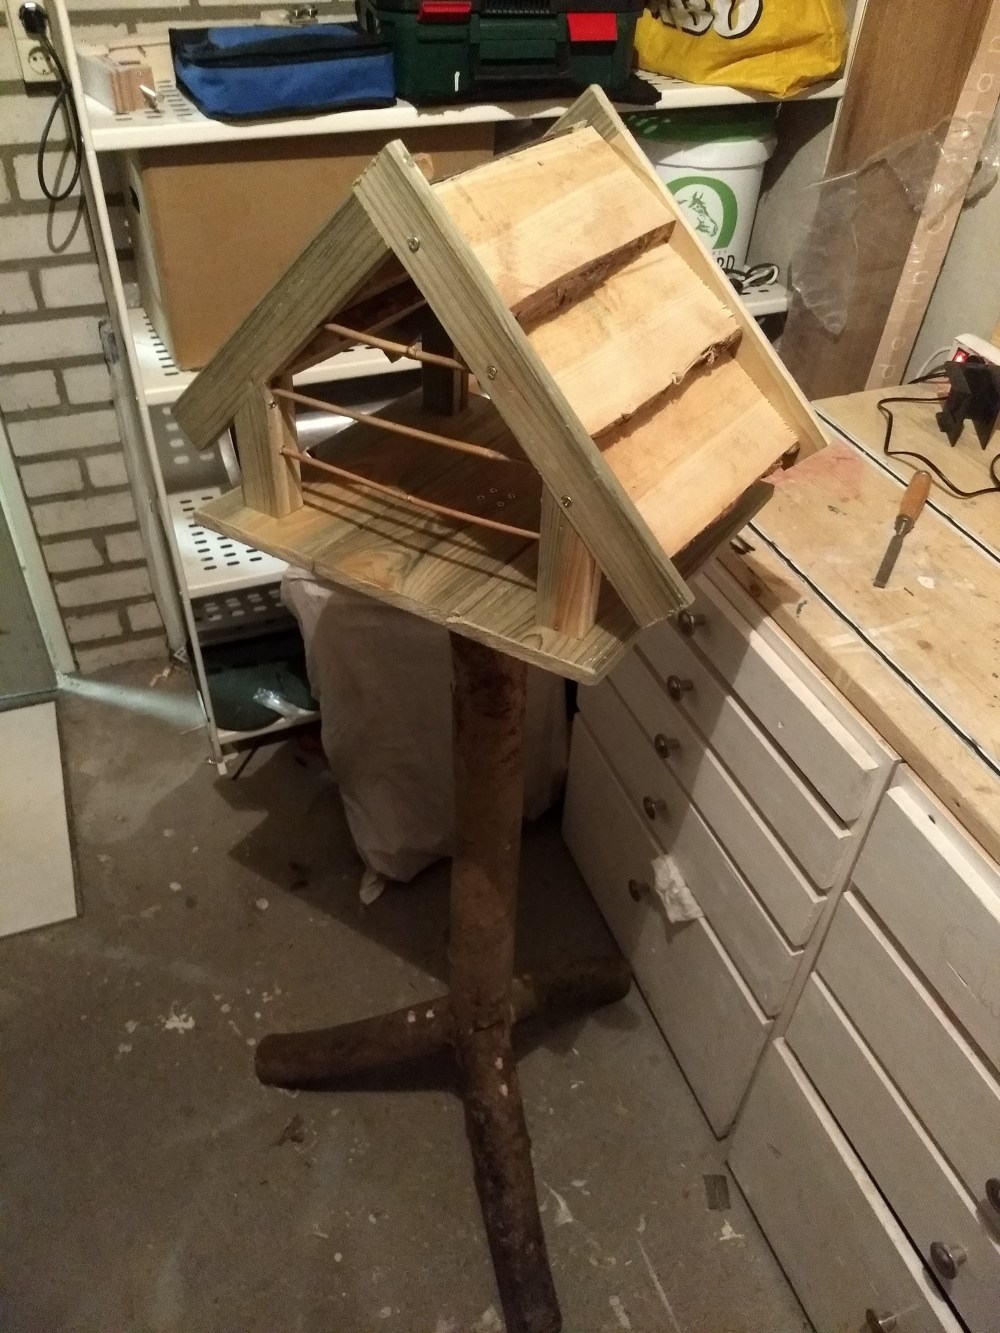
Platform and House
The platform that the house is built on is nothing fancy. In fact, it’s three bits of plank, 35 centimeters by 14, attached by two planks in opposite direction. I attached the combined plank with four self-drilling screws right in the centre and into the pole.


On the right you can see that I a glued pieces of treated lumber together to form the uprights for the house. Gluing them togeher adds strength and provides a really convenient spot of the roof to sit on later.
That roof is made up of sides and panels. The sides are two longer strips of treated lumber, made by ripping up planks in three equal parts. Cut those strips to length, leaving one longer than the other. This increase in length is the exact width of the strip.
I attached them, after pre-drilling, and screwed them one the uprights frow below. This is tricky and requires pre-drilling. What I did was attach the sides of the roof by screwing in an upward screw through the upright.


The panels were made using a long live-edged board I cut at the hardware store. I cut them to length and applied them using the regular method of using self-drilling screws. As you can see by comparing the bottom-right photo of the collection above, with the photo below, I went in afterwards to adjust the roof. I could not stand that the panels were not spread out equally.
Attached the piano hinge, et voil- No this was actually, and always is, a very annoying part. I am considering putting the sides of the roof on first, next time, screw in the hinge, attach the “door” and only then attaching the sides to the uprights. This too, however, would complicate things.
For style, and to keep larger birds out, I added some horizontal bars using bamboo that’s often used to hold plants upright in gardens. I drill a hole for the bamboo to go into, slid them in an hammered in a wedge, made out of bamboo. In the end, it all sat firmly. As you can see from the video below, the hinge works expertly.
